Difference between revisions of "Alternator Removal & Replacement"
1985amceagle (Talk | contribs) |
|||
| (5 intermediate revisions by 2 users not shown) | |||
| Line 3: | Line 3: | ||
by AMC Eagle Nest member 83Eagle! | by AMC Eagle Nest member 83Eagle! | ||
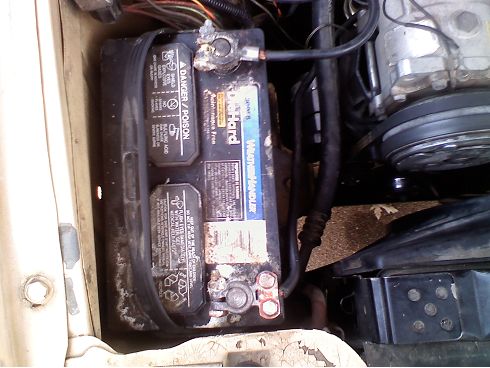
| − | 1. Unhook the | + | 1. Unhook the Negative (-) Terminal on the battery |
| − | + | ||
| − | + | ||
| − | + | ||
| Line 27: | Line 24: | ||
b. Be careful not to drop the bolt – It’ll land on top of the brush guard, which is difficult to reach | b. Be careful not to drop the bolt – It’ll land on top of the brush guard, which is difficult to reach | ||
| + | |||
5. Take out the top bolt | 5. Take out the top bolt | ||
| Line 36: | Line 34: | ||
[[Image:alt02.jpg|center]] | [[Image:alt02.jpg|center]] | ||
| + | |||
| + | |||
| + | 6. Pull up on the alternator slightly (loosens the belt) | ||
| + | |||
| + | |||
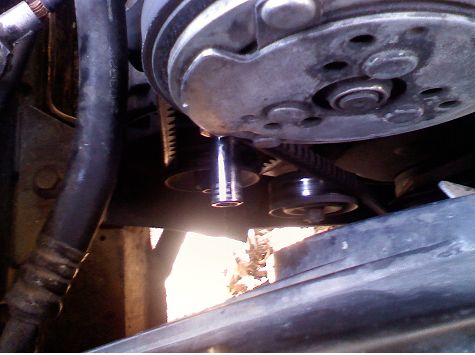
| + | 7. Slide the belt off the pulley connected to the alternator. | ||
| + | |||
| + | |||
| + | 8. Move the alternator down and away from the bracket (toward the floor and firewall) | ||
| + | |||
| + | |||
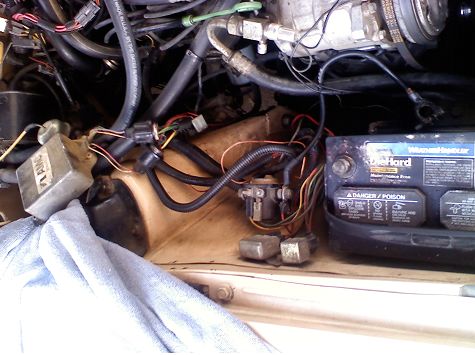
| + | 9. Unbolt the Ignition Control Module (ICM) | ||
| + | |||
| + | a. 3 screws hold it in | ||
| + | |||
| + | b. 8 mm deep socket needed | ||
| + | |||
| + | |||
| + | |||
| + | [[Image:alt03.jpg|center]] | ||
| + | |||
| + | |||
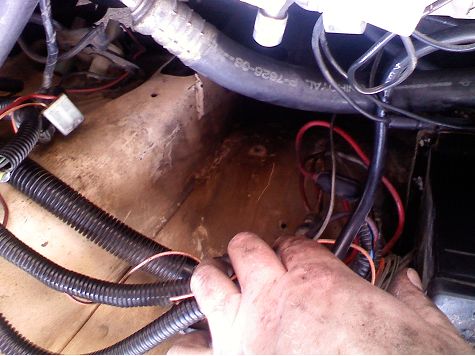
| + | 10. Pull the alternator out through the opening made from moving the ICM | ||
| + | |||
| + | |||
| + | [[Image:alt04.jpg|center]] | ||
| + | |||
| + | |||
| + | 11. Check to make sure the replacement alternator has the correct pulley | ||
| + | |||
| + | A. I had to make 3 trips to O’Reilly’s for this issue. | ||
| + | |||
| + | B. The alternator I’m holding is from the Eagle, and the alternator in the box has the 2nd pulley they gave me claiming it was correct. | ||
| + | |||
| + | |||
| + | |||
| + | [[Image:alt05.jpg|center]] | ||
| + | |||
| + | |||
| + | 12. Move the new alternator into position | ||
| + | |||
| + | a. Line up the top bolt holes (on the bracket and the alternator) | ||
| + | |||
| + | b. Then place a screw driver through the two holes to keep them aligned | ||
| + | (Sorry no picture) | ||
| + | |||
| + | |||
| + | 13. Move the belt onto the pulley of the new alternator | ||
| + | |||
| + | a. Be careful that the belt doesn’t come off the AC pulley, or go out of alignment of the AC pulley. | ||
| + | |||
| + | |||
| + | 14. Install the bottom bolt | ||
| + | a. 15 mm deep socket needed | ||
| + | |||
| + | b. You’ll need to make sure to hold the nut in place on the back side of the bolt | ||
| + | |||
| + | c. Assistance may be needed at this point (I needed it). | ||
| + | |||
| + | |||
| + | For Steps 14 – 17 it was too dark to get good pictures. I’m sorry | ||
| + | |||
| + | |||
| + | 15. Install the top bolt | ||
| + | |||
| + | |||
| + | 16. Reinstall the wire to the back of the alternator (bolt) | ||
| + | It is on the right side of this picture. Toward the bottom of the alternator | ||
| + | |||
| + | |||
| + | |||
| + | [[Image:alt06.jpg|center]] | ||
| + | |||
| + | |||
| + | Here’s a reference shot of the bolt you are looking for. | ||
| + | |||
| + | |||
| + | |||
| + | [[Image:alt07.jpg|center]] | ||
| + | |||
| + | |||
| + | 17. Replace the white clip to it’s proper position on the back of the alternator | ||
| + | |||
| + | a. Remember the retainer clip goes on the side toward the front of the car. | ||
| + | |||
| + | |||
| + | Here’s a shot of where the white plug is when the alternator is installed | ||
| + | |||
| + | |||
| + | [[Image:alt08.jpg|center]] | ||
| + | |||
| + | |||
| + | Here’s a shot of the outlet that the white plug goes into. | ||
| + | |||
| + | |||
| + | [[Image:alt09.jpg|center]] | ||
| + | |||
| + | |||
| + | |||
| + | 18. Reinstall the ICM | ||
| + | |||
| + | a. Start with the top bolt first | ||
| + | |||
| + | |||
| + | 19. Reconnect the cable to the negative terminal of the battery. | ||
| + | |||
| + | |||
| + | [[Image:alt10.jpg|center]] | ||
| + | |||
| + | |||
| + | 20. Get your keys out and place yourself in the driver’s seat. | ||
| + | |||
| + | |||
| + | 21. Start your engine | ||
| + | |||
| + | |||
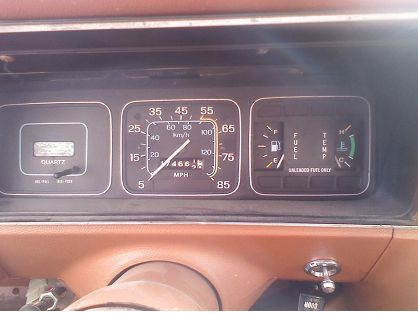
| + | 22. Observe that the battery light is no longer lit | ||
| + | |||
| + | a. Do a happy dance if you feel so inclined. | ||
| + | |||
| + | |||
| + | [[Image:alt11.jpg|center]] | ||
| + | |||
| + | |||
| + | No battery light! Happy times! | ||
Latest revision as of 22:30, 29 April 2013
AMC Eagle 258 Alternator replacement (with AC)
by AMC Eagle Nest member 83Eagle!
1. Unhook the Negative (-) Terminal on the battery
2. Unbolt the wire on the back of the alternator
a. Be careful not to drop the bolt, because it’ll land on top of the brush guard.
3. Unhook the white plug on the back of the alternator.
b. It is on the Driver’s side of the alternator
c. The plug pulls straight out (toward the Driver’s side) -- Pull the clip holding the plug in toward the front of the Eagle
4. Take out the bottom bolt
a. 15 mm deep socket needed
b. Be careful not to drop the bolt – It’ll land on top of the brush guard, which is difficult to reach
5. Take out the top bolt
a. Make sure the handle of your socket wrench is pointing toward the ground, or else you won’t have enough room to turn the wrench
b. 15 mm socket wrench needed
6. Pull up on the alternator slightly (loosens the belt)
7. Slide the belt off the pulley connected to the alternator.
8. Move the alternator down and away from the bracket (toward the floor and firewall)
9. Unbolt the Ignition Control Module (ICM)
a. 3 screws hold it in
b. 8 mm deep socket needed
10. Pull the alternator out through the opening made from moving the ICM
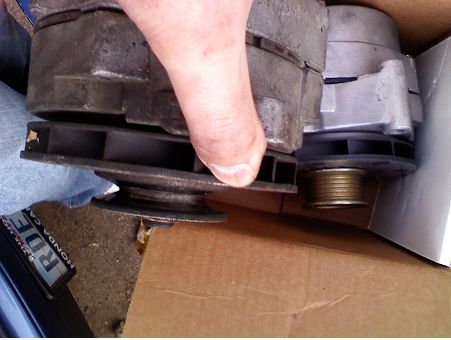
11. Check to make sure the replacement alternator has the correct pulley
A. I had to make 3 trips to O’Reilly’s for this issue.
B. The alternator I’m holding is from the Eagle, and the alternator in the box has the 2nd pulley they gave me claiming it was correct.
12. Move the new alternator into position
a. Line up the top bolt holes (on the bracket and the alternator)
b. Then place a screw driver through the two holes to keep them aligned (Sorry no picture)
13. Move the belt onto the pulley of the new alternator
a. Be careful that the belt doesn’t come off the AC pulley, or go out of alignment of the AC pulley.
14. Install the bottom bolt
a. 15 mm deep socket needed
b. You’ll need to make sure to hold the nut in place on the back side of the bolt
c. Assistance may be needed at this point (I needed it).
For Steps 14 – 17 it was too dark to get good pictures. I’m sorry
15. Install the top bolt
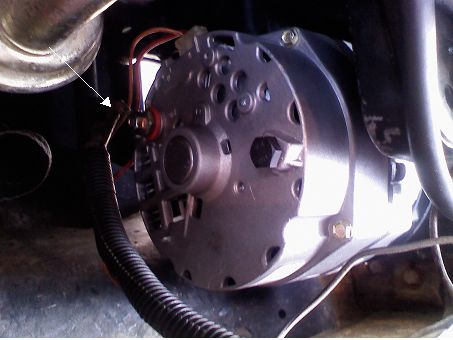
16. Reinstall the wire to the back of the alternator (bolt)
It is on the right side of this picture. Toward the bottom of the alternator
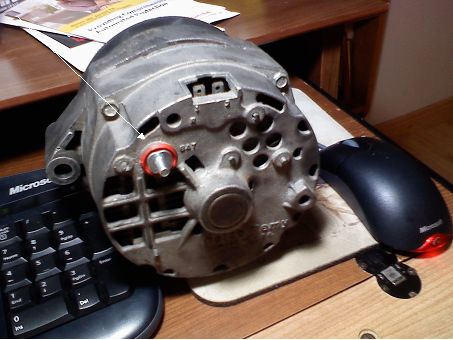
Here’s a reference shot of the bolt you are looking for.
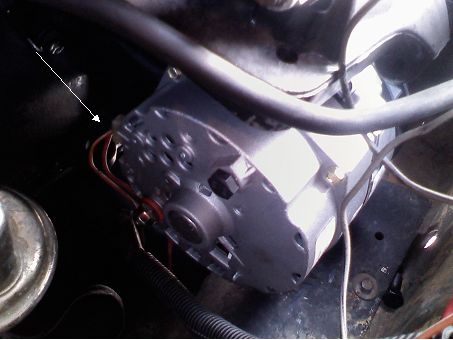
17. Replace the white clip to it’s proper position on the back of the alternator
a. Remember the retainer clip goes on the side toward the front of the car.
Here’s a shot of where the white plug is when the alternator is installed
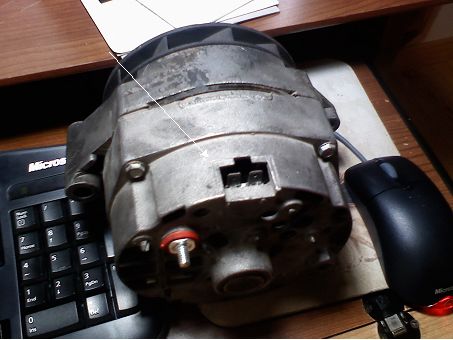
Here’s a shot of the outlet that the white plug goes into.
18. Reinstall the ICM
a. Start with the top bolt first
19. Reconnect the cable to the negative terminal of the battery.
20. Get your keys out and place yourself in the driver’s seat.
21. Start your engine
22. Observe that the battery light is no longer lit
a. Do a happy dance if you feel so inclined.
No battery light! Happy times!
