Difference between revisions of "TFI Upgrade"
(→TFI Upgrade) |
1985amceagle (Talk | contribs) |
||
| (13 intermediate revisions by 3 users not shown) | |||
| Line 1: | Line 1: | ||
''Submitted by IowaEagle'' | ''Submitted by IowaEagle'' | ||
| − | + | One of the most inexpensive ways to improve your 258 is to give it a hotter spark which will result in some modest performance gains. This an easy upgrade as basically all it amounts to is a tune-up; and it is a lot cheaper and easier than doing the HEI Upgrade. According to those who have done both the TFI and the HEI they have found the results are about the same. | |
| − | + | The TFI upgrade is considered by many the second thing you should for your Eagle's 4.2 engine after your replace the plastic valve cover. It has been reported the TFI conversion will add 800 to 1,000 additional useable RPM and a slight improvement in your MPG. I know it did for me. And the best part it uses off the shelf parts for virtually a plug and play installation. | |
| − | + | Why should you do this? Your stock AMC coil puts out about a measley 18,000 volts. To run much more efficiently you will benefit from a hotter coil that puts out 35,000 - 40,000+ volts. However just replacing the coil will not do much for you. This is because since the small diameter original equipment type distributor cap married to a hotter coil will result in arcing inside the cap. That is not good. The parts you will replace doing the TFI will stop that from happening. | |
| − | + | ||
| − | Why should you do this? Your stock AMC coil puts out about a measley 18,000 volts. To run much more efficiently you will benefit from a hotter coil that puts out 35,000 - 40,000+ volts. However just replacing the coil will not do much for you since | + | |
The parts you will need are from Ford applications with the 300 Inline-6 engine. Since AMC used a Ford distributor and ignition box these parts interchange without any modifications whatsoever. And the best thing is you don't have to remove your present distributor to do this. | The parts you will need are from Ford applications with the 300 Inline-6 engine. Since AMC used a Ford distributor and ignition box these parts interchange without any modifications whatsoever. And the best thing is you don't have to remove your present distributor to do this. | ||
| Line 16: | Line 14: | ||
[[Image:Newcap.jpg]] '''New Distributor Cap - GP Sorenson FR121''' | [[Image:Newcap.jpg]] '''New Distributor Cap - GP Sorenson FR121''' | ||
| − | |||
| − | |||
[[Image:Newrotor.jpg]] '''New Rotor - GP Sorenson FR 106''' | [[Image:Newrotor.jpg]] '''New Rotor - GP Sorenson FR 106''' | ||
| + | |||
| + | [[Image:Capadapter.jpg]] '''Cap Adapter - GP Sorenson FR109''' | ||
| + | |||
| + | |||
| + | '''Also, check for distributor Cap Part number - FD151T - It's for a 1979 Ford F150 300 Straight 6 engine. (I don't know if this is a Canadian number, but I replaced my cap, and this is the part number - Editors)''' | ||
| + | |||
| + | |||
| + | To carry all the new spark from your new coil (described below) you will also need to upgrade to 8 mm plug wires with the correct ends to fit your new cap. You probably need new wires anyway -- especially if your present ones have the AMC logo on them. I used the store brand from Advance Auto Part Number '''Xact 2962'''. | ||
| + | |||
| + | This is also a good time to get new spark plugs; unless you just put some in. You can use the brand you prefer. Just make sure to get ones for an AMC 258. '''Gap these to .045'''. | ||
| + | |||
| + | The heart of your TFI upgrade is of course a new hotter coil. I used the Accel 8140 ($30.00) For $5.00 more you can get the one where the OEM coil connector on your Eagle plugs right on. If you use the less expensive one you will need to remove the connector to get to the wires to attach them to the posts. | ||
| + | |||
| + | [[Image:Newcoil.jpg]] '''Accel 8140 Coil''' | ||
| + | |||
| + | Now to the How To part of this upgrade. | ||
| + | |||
| + | Disconnect your battery (safety first). | ||
| + | |||
| + | Remove your coil wire. That is the one in the middle of the distributor cap that goes to the present coil. | ||
| + | |||
| + | Loosen the screws on your present cap and remove cap along with the spark plug wires. | ||
| + | |||
| + | Remove old rotor from distibutor. | ||
| + | |||
| + | Install spacer. You will notice the screws are tightened from the inside of the spacer. Spacer is notched and only goes on one way. Tighten screws. | ||
| + | |||
| + | Install new rotor. It too is notched and only goes on one way. | ||
| + | |||
| + | Install cap. Again notched and goes on one way. Snap the attaching clips into position to secure cap. | ||
| + | |||
| + | Remove old spark plugs -- if you are using them regap to .045 '''OR''' gap the new plugs you bought to the same specs. Install plugs. | ||
| + | |||
| + | Now remove the plug on top of your coil and let it dangle. | ||
| + | |||
| + | Remove the coil bracket from the engine (this makes it easier to remove the old and install the new coil). Two bolts hold it to the block. The coil will come with it so hang on to it when you take the last bolt out. | ||
| + | |||
| + | Swap out your coils -- make sure to tighten screw on bracket that holds coil in place. | ||
| + | |||
| + | Now if you purchased the coil that does not have the spade studs for your old connector to just fit right back on you will need to do a little wiring. First you need to locate the positve lug on the old coil and then look at your connector to see which wires went to that one. Clip the positive side wire or wires as close as you can to the connector and crimp on a suitable sized insulated loop connector (just large enough to go over the stud of the new coil). Once you have the connector on check to make sure the crimp holds. Now attach it too the positive stud on the new coil. | ||
| + | |||
| + | Repeat the above operation with the negative side. Make sure all connections are tight. | ||
| + | |||
| + | Unbox your new spark plug wires. There should be six plug wires and maybe two coil wires. Lay them out by length. The two longest will go to the very front and very rear plugs (cylinders 1 & 6) -- the two shortest ones will go to the inside plugs (cylinders 3 & 4). | ||
| + | |||
| + | Using the Six Cylinder Firing Order Chart found below begin installing your plug wires starting with the number one wire on the cap. '''Note some caps are marked with a #1 this may or may not be correct for our application. Our number one plug when looking down at the cap from the fender is close to the 6:00 position (Reference the diagram below) -- some of these caps may have #1 in the 7:00 position you do not want to start there. ''' Work clockwise until all are done. Make sure all connections are tight. | ||
| + | |||
| + | [[Image:Sixfire.jpg]] | ||
| + | |||
| + | The numbers on the distributor may be hard to read. The firing order is as follows. '''1 - 5 - 3 - 6 - 2 - 4'''. So plug wire number 1 on the distributor (the hole nearest you when looking down on the cap from over the fender) goes to the very front spark plug. The next position clockwise on the distributor is #5 and it goes to the next to last plug on the engine. So just keep going until all six are done. | ||
| + | |||
| + | Now install the coil wire. If more than one is supplied use the one that looks to be the appropriate length without being too long. | ||
| + | |||
| + | Now, double check everything -- especially that your plug wires go to the correct plugs. | ||
| + | |||
| + | Reconnect your battery. | ||
| + | |||
| + | Start car. If everything was done right it should purr like a kitten. | ||
| + | |||
| + | Test drive your AMC Eagle and see if you notice any difference. | ||
Latest revision as of 22:30, 29 April 2013
Submitted by IowaEagle
One of the most inexpensive ways to improve your 258 is to give it a hotter spark which will result in some modest performance gains. This an easy upgrade as basically all it amounts to is a tune-up; and it is a lot cheaper and easier than doing the HEI Upgrade. According to those who have done both the TFI and the HEI they have found the results are about the same.
The TFI upgrade is considered by many the second thing you should for your Eagle's 4.2 engine after your replace the plastic valve cover. It has been reported the TFI conversion will add 800 to 1,000 additional useable RPM and a slight improvement in your MPG. I know it did for me. And the best part it uses off the shelf parts for virtually a plug and play installation.
Why should you do this? Your stock AMC coil puts out about a measley 18,000 volts. To run much more efficiently you will benefit from a hotter coil that puts out 35,000 - 40,000+ volts. However just replacing the coil will not do much for you. This is because since the small diameter original equipment type distributor cap married to a hotter coil will result in arcing inside the cap. That is not good. The parts you will replace doing the TFI will stop that from happening.
The parts you will need are from Ford applications with the 300 Inline-6 engine. Since AMC used a Ford distributor and ignition box these parts interchange without any modifications whatsoever. And the best thing is you don't have to remove your present distributor to do this.
I purchased my parts from Advance Auto so I will be using their part numbers -- your part's person can easily cross these numbers over to the brands they sell.
You will need for the distributor a new larger diameter cap, an adapter for the cap to fit on your current distributor and the rotor for the new cap.
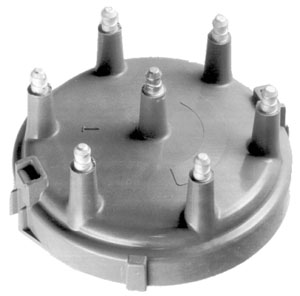 New Distributor Cap - GP Sorenson FR121
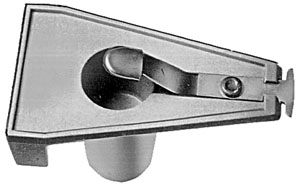 New Rotor - GP Sorenson FR 106
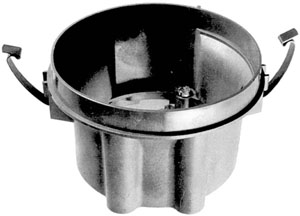 Cap Adapter - GP Sorenson FR109
Also, check for distributor Cap Part number - FD151T - It's for a 1979 Ford F150 300 Straight 6 engine. (I don't know if this is a Canadian number, but I replaced my cap, and this is the part number - Editors)
To carry all the new spark from your new coil (described below) you will also need to upgrade to 8 mm plug wires with the correct ends to fit your new cap. You probably need new wires anyway -- especially if your present ones have the AMC logo on them. I used the store brand from Advance Auto Part Number Xact 2962.
This is also a good time to get new spark plugs; unless you just put some in. You can use the brand you prefer. Just make sure to get ones for an AMC 258. Gap these to .045.
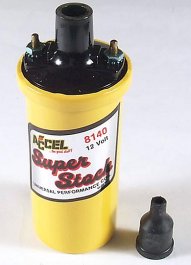
The heart of your TFI upgrade is of course a new hotter coil. I used the Accel 8140 ($30.00) For $5.00 more you can get the one where the OEM coil connector on your Eagle plugs right on. If you use the less expensive one you will need to remove the connector to get to the wires to attach them to the posts.
Now to the How To part of this upgrade.
Disconnect your battery (safety first).
Remove your coil wire. That is the one in the middle of the distributor cap that goes to the present coil.
Loosen the screws on your present cap and remove cap along with the spark plug wires.
Remove old rotor from distibutor.
Install spacer. You will notice the screws are tightened from the inside of the spacer. Spacer is notched and only goes on one way. Tighten screws.
Install new rotor. It too is notched and only goes on one way.
Install cap. Again notched and goes on one way. Snap the attaching clips into position to secure cap.
Remove old spark plugs -- if you are using them regap to .045 OR gap the new plugs you bought to the same specs. Install plugs.
Now remove the plug on top of your coil and let it dangle.
Remove the coil bracket from the engine (this makes it easier to remove the old and install the new coil). Two bolts hold it to the block. The coil will come with it so hang on to it when you take the last bolt out.
Swap out your coils -- make sure to tighten screw on bracket that holds coil in place.
Now if you purchased the coil that does not have the spade studs for your old connector to just fit right back on you will need to do a little wiring. First you need to locate the positve lug on the old coil and then look at your connector to see which wires went to that one. Clip the positive side wire or wires as close as you can to the connector and crimp on a suitable sized insulated loop connector (just large enough to go over the stud of the new coil). Once you have the connector on check to make sure the crimp holds. Now attach it too the positive stud on the new coil.
Repeat the above operation with the negative side. Make sure all connections are tight.
Unbox your new spark plug wires. There should be six plug wires and maybe two coil wires. Lay them out by length. The two longest will go to the very front and very rear plugs (cylinders 1 & 6) -- the two shortest ones will go to the inside plugs (cylinders 3 & 4).
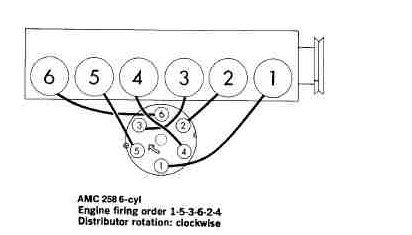
Using the Six Cylinder Firing Order Chart found below begin installing your plug wires starting with the number one wire on the cap. Note some caps are marked with a #1 this may or may not be correct for our application. Our number one plug when looking down at the cap from the fender is close to the 6:00 position (Reference the diagram below) -- some of these caps may have #1 in the 7:00 position you do not want to start there. Work clockwise until all are done. Make sure all connections are tight.
The numbers on the distributor may be hard to read. The firing order is as follows. 1 - 5 - 3 - 6 - 2 - 4. So plug wire number 1 on the distributor (the hole nearest you when looking down on the cap from over the fender) goes to the very front spark plug. The next position clockwise on the distributor is #5 and it goes to the next to last plug on the engine. So just keep going until all six are done.
Now install the coil wire. If more than one is supplied use the one that looks to be the appropriate length without being too long.
Now, double check everything -- especially that your plug wires go to the correct plugs.
Reconnect your battery.
Start car. If everything was done right it should purr like a kitten.
Test drive your AMC Eagle and see if you notice any difference.
