Difference between revisions of "CV Half Shafts"
| (2 intermediate revisions by the same user not shown) | |||
| Line 1: | Line 1: | ||
| − | ''How To | + | ''How To Contributed by AMC Eagle Nest Members Rambler66 and Eagle1985, edited by IowaEagle'' |
| − | '''Tools Needed:''' 1/2' Breaker bar and perhaps a "cheater bar" for the outer axle nut. You will need either a 1 3/8" or 36mm socket to remove the axle nut. NOTE: There is a possibility you will also need a 1 7/16" socket as some replacement half shafts use this nut. You will also need a | + | '''Tools Needed:''' 1/2' Breaker bar and perhaps a "cheater bar" for the outer axle nut. You will need either a 1 3/8" or 36mm socket to remove the axle nut. NOTE: There is a possibility you will also need a 1 7/16" socket as some replacement half shafts use this nut. You will also need a 8 mm bit to fit into the inboard bolts that attach the axle shaft to the axle tube. You will also need a torque wrench to correctly tighten the axle nut. |
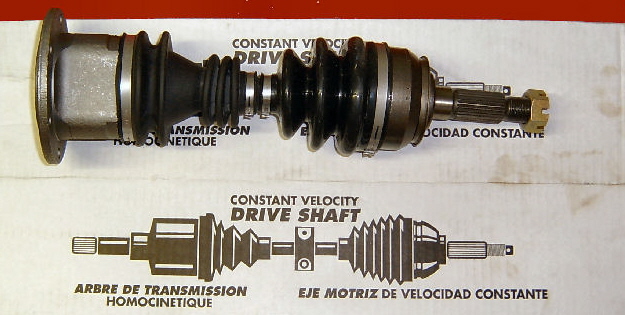
'''Parts Needed''' Rebuilt Axle Half Shaft(s). Both sides are the same part number. Don't waste your time tyring to rebuild or reboot. | '''Parts Needed''' Rebuilt Axle Half Shaft(s). Both sides are the same part number. Don't waste your time tyring to rebuild or reboot. | ||
[[Image:rebuilthalfshaft.jpg]] | [[Image:rebuilthalfshaft.jpg]] | ||
| + | ''Photo courtesy of Eagle1985'' | ||
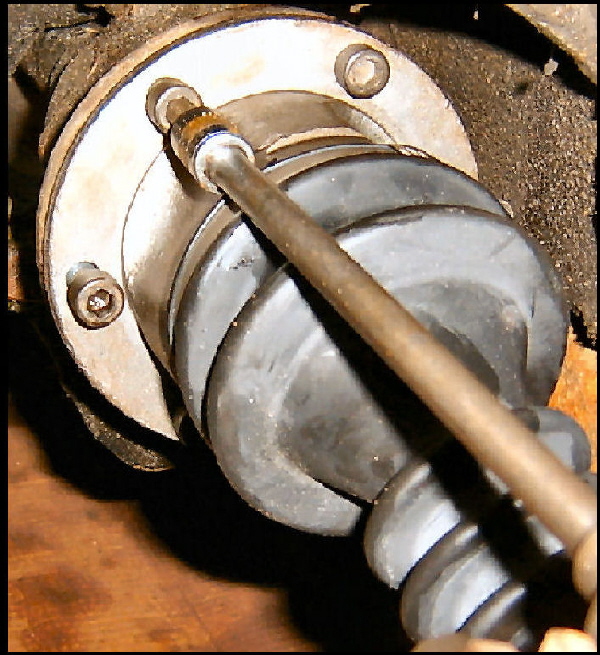
| − | + | The half shaft was actually quite simple. Remove wheel cover or on wheels with the center cap you can remove the cap to have access to the axle nut. Of course you can remove the entire wheel if you choose. With the car on the ground and the rear wheels blocked use your breaker bar with the correct socket to remove the axle nut. Then I removed the bolts where the halfshaft flange attaches to the output shaft flange 6 allen wrench bolts (8 mm). | |
| − | The half shaft was actually quite simple. | + | |
[[Image:inboardbolts.jpg]] | [[Image:inboardbolts.jpg]] | ||
| + | ''Photo courtesy of Eagle1985'' | ||
| − | + | I then lowered the inside end of the axle shaft until it cleared the output shaft then just pulled straight back and the end of the shaft slid right out of the hub. Now insert the end of the new shaft in the hub and slide it straight in then raise the assembly into place and bolt it back to the output flange, torquing the bolts to 45 foot pounds and then reinstall the axle nut torquing it to 180 foot pounds. | |
| − | + | ||
Jamie Smith | Jamie Smith | ||
Spokane, WA. | Spokane, WA. | ||
Latest revision as of 00:02, 15 December 2005
How To Contributed by AMC Eagle Nest Members Rambler66 and Eagle1985, edited by IowaEagle
Tools Needed: 1/2' Breaker bar and perhaps a "cheater bar" for the outer axle nut. You will need either a 1 3/8" or 36mm socket to remove the axle nut. NOTE: There is a possibility you will also need a 1 7/16" socket as some replacement half shafts use this nut. You will also need a 8 mm bit to fit into the inboard bolts that attach the axle shaft to the axle tube. You will also need a torque wrench to correctly tighten the axle nut.
Parts Needed Rebuilt Axle Half Shaft(s). Both sides are the same part number. Don't waste your time tyring to rebuild or reboot.
The half shaft was actually quite simple. Remove wheel cover or on wheels with the center cap you can remove the cap to have access to the axle nut. Of course you can remove the entire wheel if you choose. With the car on the ground and the rear wheels blocked use your breaker bar with the correct socket to remove the axle nut. Then I removed the bolts where the halfshaft flange attaches to the output shaft flange 6 allen wrench bolts (8 mm).
I then lowered the inside end of the axle shaft until it cleared the output shaft then just pulled straight back and the end of the shaft slid right out of the hub. Now insert the end of the new shaft in the hub and slide it straight in then raise the assembly into place and bolt it back to the output flange, torquing the bolts to 45 foot pounds and then reinstall the axle nut torquing it to 180 foot pounds.
Jamie Smith Spokane, WA.

