Difference between revisions of "Shock Stud Extensions"
(New page: By AMC Eagle Nest member trapperjack) |
|||
| Line 1: | Line 1: | ||
By AMC Eagle Nest member trapperjack | By AMC Eagle Nest member trapperjack | ||
| + | |||
| + | NOTE: all my torque specs are from the "Big Book of Redneck Engineering". Actual specs may exist somewhere. | ||
| + | |||
| + | After homemade lift and add-a-leaf, my brand new Monroe Sensa-trac coil-overs were topping out. Every time the rear axle dropped a few inches, "Clunk" from the rear shocks. Found extensions at Autozone for vehicle with 2" lift and came to put them on. Wrong thread type. The Autozone (part #13-6501) and all others I could find are for studs that are 3/8 x 24 thread. The Monroe Sensa-trac is 3/8 x 16 (coarse) thread. So I take one with me to my local home owned parts store, and build a pair for myself. | ||
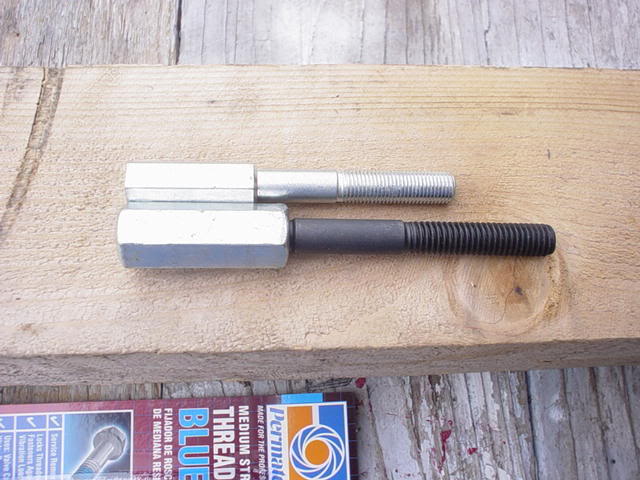
| + | You'll need 2 heavy duty threaded rod connectors for 3/8 coarse thread, 2 exhaust manifold studs 3/8 coarse both sides, and some blue locktite. One end of the exhaust manny stud is shorter than the other. The short end goes into the coupler. Side by side, the store bought -vs- homemade. Mine is much beefier. | ||
| + | |||
| + | |||
| + | [[Image:sxt01.jpg|center]] | ||
| + | |||
| + | |||
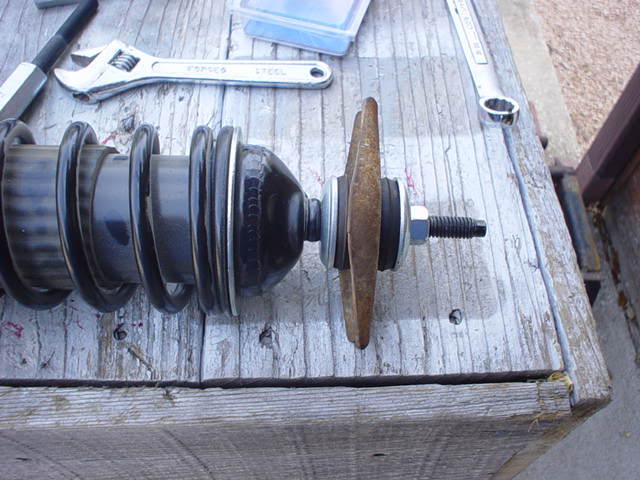
| + | Remove your rear shocks (do 1 at a time) using 1/2 inch wrench up top, and 3/4 deep socket below. You'll need to jack up the body a bit to relieve tension on the shock. You should pull out something that looks like this.... | ||
| + | |||
| + | |||
| + | [[Image:sxt02.jpg|center]] | ||
| + | |||
| + | |||
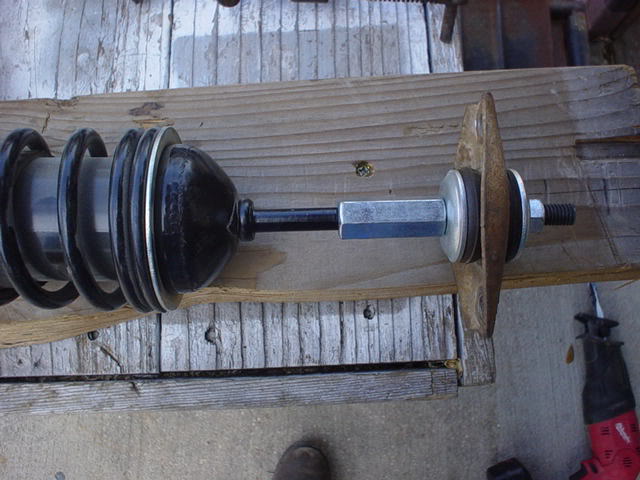
| + | Remove the nut, washers, grommets, and mounting plate from shock. Use a hacksaw or grinder to knock off the end of the stud, just the unthreaded part. Put the short end of the exhaust manny bolt into the coupler after putting a little blue locktite on the threads. Tighten till it won't go anymore, plus 1/4 turn. Install the washers, grommets, mounting plate, and nut exactly as they came off the shock. Make note of where the nut first contacts the washer when tightening. You'll see why later. Tighten down to tight plus 1/4. Test fit this assembly to see if it will mount back up in the hole. Mine wouldn't, so with everything tightened down, I cut off about 1/2" of end of new stud. Make sure not to cut too much off, or could keep you from getting back together later. Put a little locktite on the shock's stud and thread the whole assembly onto shock. Tight as it'll go plus 1/4. Should have something like this... | ||
| + | |||
| + | |||
| + | [[Image:sxt03.jpg|center]] | ||
| + | |||
| + | |||
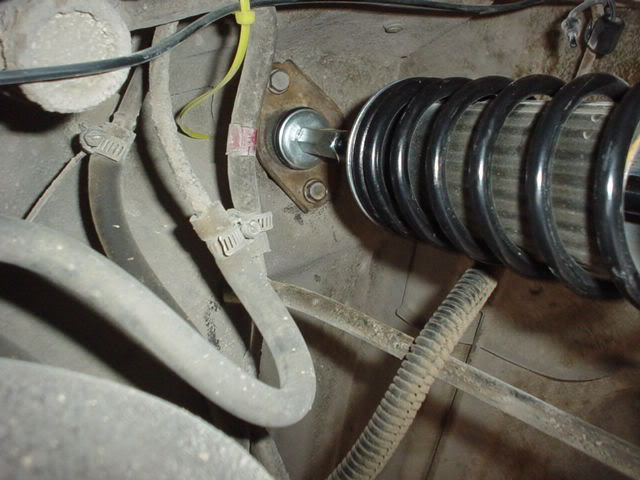
| + | Reattaching shock is easier, as the spacer gives you room to get a wrench and hands up there. Passenger side was hardest to get started, but once started, tighten up the top bolts. Will probably need to raise the BODY of the vehicle with jack to get bottom eyelet onto stud. Once istalled, should look like this...see all the extra room around mounting plate? | ||
| + | |||
| + | |||
| + | [[Image:sxt04.jpg|center]] | ||
| + | |||
| + | |||
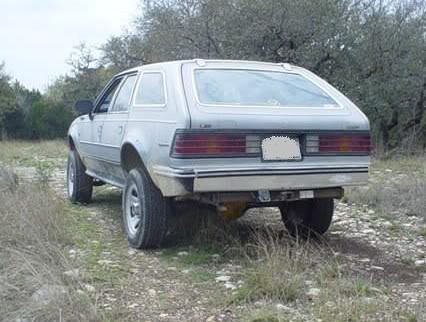
| + | Once everything's tightened up on both sides, let her down and test drive. Got rid of my clunk, and much of the squeaking and creaking I had. Ended up with a nice stance to the old bird. | ||
| + | |||
| + | |||
| + | [[Image:sxt05.jpg|center]] | ||
Latest revision as of 15:40, 15 November 2009
By AMC Eagle Nest member trapperjack
NOTE: all my torque specs are from the "Big Book of Redneck Engineering". Actual specs may exist somewhere.
After homemade lift and add-a-leaf, my brand new Monroe Sensa-trac coil-overs were topping out. Every time the rear axle dropped a few inches, "Clunk" from the rear shocks. Found extensions at Autozone for vehicle with 2" lift and came to put them on. Wrong thread type. The Autozone (part #13-6501) and all others I could find are for studs that are 3/8 x 24 thread. The Monroe Sensa-trac is 3/8 x 16 (coarse) thread. So I take one with me to my local home owned parts store, and build a pair for myself. You'll need 2 heavy duty threaded rod connectors for 3/8 coarse thread, 2 exhaust manifold studs 3/8 coarse both sides, and some blue locktite. One end of the exhaust manny stud is shorter than the other. The short end goes into the coupler. Side by side, the store bought -vs- homemade. Mine is much beefier.
Remove your rear shocks (do 1 at a time) using 1/2 inch wrench up top, and 3/4 deep socket below. You'll need to jack up the body a bit to relieve tension on the shock. You should pull out something that looks like this....
Remove the nut, washers, grommets, and mounting plate from shock. Use a hacksaw or grinder to knock off the end of the stud, just the unthreaded part. Put the short end of the exhaust manny bolt into the coupler after putting a little blue locktite on the threads. Tighten till it won't go anymore, plus 1/4 turn. Install the washers, grommets, mounting plate, and nut exactly as they came off the shock. Make note of where the nut first contacts the washer when tightening. You'll see why later. Tighten down to tight plus 1/4. Test fit this assembly to see if it will mount back up in the hole. Mine wouldn't, so with everything tightened down, I cut off about 1/2" of end of new stud. Make sure not to cut too much off, or could keep you from getting back together later. Put a little locktite on the shock's stud and thread the whole assembly onto shock. Tight as it'll go plus 1/4. Should have something like this...
Reattaching shock is easier, as the spacer gives you room to get a wrench and hands up there. Passenger side was hardest to get started, but once started, tighten up the top bolts. Will probably need to raise the BODY of the vehicle with jack to get bottom eyelet onto stud. Once istalled, should look like this...see all the extra room around mounting plate?
Once everything's tightened up on both sides, let her down and test drive. Got rid of my clunk, and much of the squeaking and creaking I had. Ended up with a nice stance to the old bird.
