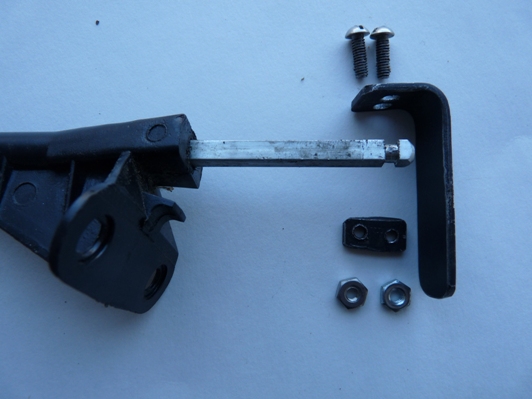
Hood Release Handle Repair
By AMC Eagle Nest Member "Tennessee Farmer".
Slowly Eagle owners are breaking the plastic pull handles on their hood releases. Finding replacements is becoming difficult. Here is the solution I use and it produces a hood release handle that is much stronger and easier to pull than the original. Also, it is not hard to make and install.
If you remove the broken plastic pull handle from your hood release you will find a square rod with a groove machined around it close to the end. The groove allows you to attach a substitute handle to the rod. You don’t need to remove the cable from the car. Just unbolt the two nuts that hold the cable release in place. Let in drop down and take a hacksaw blade and saw off the old plastic.
Take a piece of ¾ inch wide band steel (standard thickness about 2 mm) and cut off a piece about 3 inches longer (longer if you want a longer pull handle.) Heat it red hot about ¾ of inch from one end and make a 90 degree bend. Drill two holes in the short end, centered, and no more than 3/8 inch apart. The screws will go through these holes and the hole-size should be larger than the screw size for easy assembly. Saw off another piece of the ¾ inch band metal about 3/8 inch long. This is the base plate. Drill two holes in this no more than 3/8 inch apart. The holes should be exactly the size of the attaching screws. Grind and round corners and edges and paint.
Place the apparatus over the pull rod and slide in screws, making certain the screws fall inside the groves for a secure hold (see picture.) If your screws are too far apart, make another base plate with the holes a little closer together. Secure nuts. The ones I make, I usually do threaded holes in the base plate and thus eliminate the nuts.
Note: The layout in my picture is upsidedown - sorry. The handle will face in the opposite direction.
