Re&Re The Wiring Harness in Your Steering Column
Here is how to re&re the wiring harness in your steering column. This will also help with steering wheel removal. I appologise for all of the non technical language, but the pictures should help fill in the blanks. There are unfortunately special tools needed for this job: Compressor tool (~$25 CAD) Steering wheel or Harmonic balancer tool (~$20CAD) Both of these are tools that you’ll probably never use again, and if you do…well, that may not necessarily be a good thing.
1) First order of business is to disconnect the wiring harness at the bottom. This will prevent any electrical mishaps and prevent your horn from honking when you’re messing with things at the beginning. It isn’t really necessary to unplug the battery, though if you feel more comfortable doing that, then by all means do it.
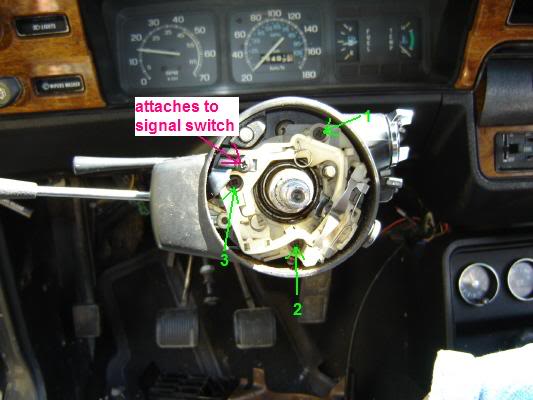
2) Remove the horn cover piece and you will see three big screws and three small screws, unscrew them and remove the pieces one at a time. Don’t forget to have a place to put them in order of removal, it helps putting it all back together.
Next you remove the big bolt in the centre….I used a 13/16 ratchet. nice and easy after the initial tug.
3) Once you get this bolt off you have to get out your puller, or what every you’ve managed to fabricate for the job.
4) Pop off the steering wheel, put it aside and you’ll be facing a couple of circular plastic bits (see…I’m technical), pull these off and put aside, keep in mind that the one on top has three grooves in it, this is where your steering wheel fits, so you’ll have to line them up later (I almost forgot to, which is why I mention it).
5) Next you get to play with that funky compression tool to depress that metal plate you’ve got in front of you. Don’t forget that it is shaped and has gaps in specific areas, you’ll need to put it back on that way. Here is the compression tool in action:
6) Here is the fun part, removal of the snap ring. Its revealed once the compression tool has pushed things as far as it can without breaking anything. I used needle nose pliers, and two small screwdrivers to coax it up the shaft I managed to keep it reusable that way since I forgot to buy a new one. I recommend stopping and grabbing a beer at this point since you’ll probably get quite irritated and swear a lot. Once you’ve found the exact way to hold your tongue its easy. Unfortunately I was unable to take pics of this procedure as I don’t have enough limbs to operate the camera and the tools. 7) Now you are facing the signal/hazard switch assembly, there is a big spring in the middle too, which you can leave right there. You need to remove the three screws that are in the body of this mechanism (which is two pieces that fit quite snugly together, so keep them that way), and the screw that attaches the signal switch itself to the plastic assembly, try not to let this little piece fall off, it’s a pain to get back on. Also remove the hazard switch from the outside of the column….you can’t get it out without doing this….trust me.
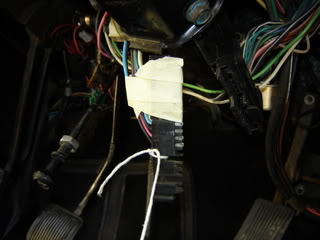
Here comes the inventive bit….Wrap tape around the wiring harness that comes out of the bottom of the column, and put a piece of string around it
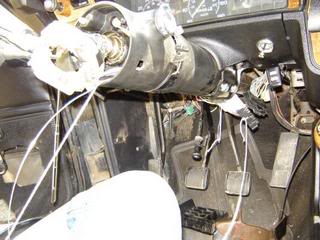
Now, take a piece of wire, tie some more string to it and feed it from the top of the steering column down through to the wiring harness, attach the string to the piece of the harness that will be going through first. The place you feed it through is right by where the wires run…don’t worry you’ll see it. Now you’ve got string on both ends of the plastic block and everything is taped up to make a nice sleek package
9) You have to pull on the string at the top, and the signal switch assembly, and use the top string to help manipulate things if it gets a little stuck along the way. I also used a screw driver from above once it was getting close and got a little stuck. Once again, once you figure the exact way to hold your tongue you’re doing great. 10) Now you’ll probably have some string hanging out the lower end of your column that is attached to the wiring harness in your hand….cut it from the old wiring harness and attach it to the new one. Tape it all up and pull it down through the column…reverse of how you got it out (this direction is MUCH smoother). 11) Fit the new/salvaged signal switch into the place of the previous one, pull that little metal bit for the signal switch up, it’ll help hold things in place. Put the three screws back in, lightly snug them down, put the screw in for the signal switch. 12) This is where I recommend that you plug the harness in and test everything before you get too far into reassembly. I didn’t get electrocuted, so you should be fine. Also, get out of the car and make sure its really working and not just blinking inside the car. If you’ve got a problem with the signal switch not turning off properly, or being too sloppy it may be the metal parts on the right hand side of the plastic assembly (between 3o’clock and 6 on the wheel). If you have to you can take these out carefully and bend them a little extra so they tighten up, or use the ones out of the recently removed harness if they worked ok before. Once you’re sure everything is working, snug the screws up some more, and put things back together. 13) Putting it together is reverse of taking it apart, just don’t forget to align everything properly, and also put the snap ring onto the centre shaft loosely before you connect your compression tool, makes life easier. Another hint…disconnect the harness for the reassembly, once again, it prevents lots of random honking and angry neighbors.


