Correctly setting your idle speed 1980 - 1988
From the AMC Technical Service Bulletin 12E460
The idle speed may be too low or inconsistent on your 1980 - 1988 Eagle automobile. If this condition exists, the following items must be adjusted to obtain proper engine operation.
Ignition Timing
Fast Idle Speed
Curb Idle Speed
Sole-Vac Throttle Postioner
Adjustment is as Follows:
Engine Timing
1. The engine must be at operating temperature and all electrical accessory switches in the OFF position.
2. Remove the air filter assembly -- make sure to mark where any vacuum hoses connected.
3. Set the parking brake or better yet block the wheels. Shift automatic transmissions to PARK and manual transmissions to the NEUTRAL position.
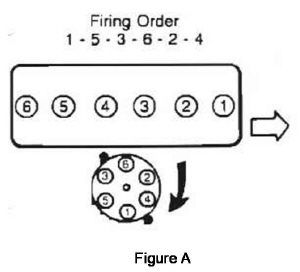
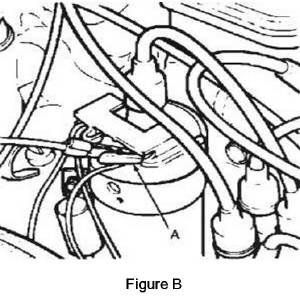
4. With the ignition switch OFF, connect an ignition timing light to the number 1 spark plug (Figure A) and tachometer to the coil ignition negative terminal (Figure B).
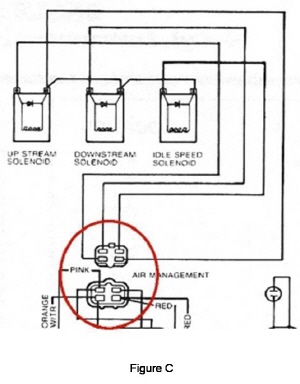
5. Diconnect the 4-in. and 10-in. Hg vacuum switch assebly wire connector located adjacent to the vacuuum switch assembly (Figure C).
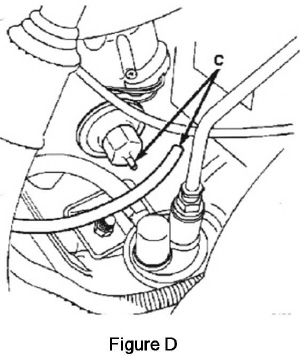
6. Disconnect and plug the distributor vacuum advance hose (C) (Figure D).
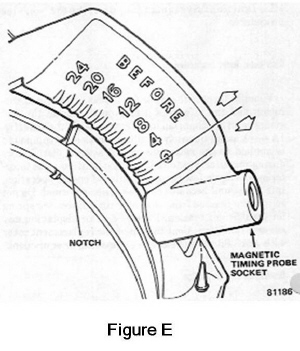
7. Clean the timing degree scale and mark the notch on the front crankshaft pulley with a white crayon. (Figure E). Start the Engine. Increase the engine speed to 1600 rpm and check the ignition timing. If necessary, adjust the the timing to the specification listed on the Emission Control Label (typically 15 degrees plus or minus 1 degree BTDC and for High Altitude cars 21 degrees plus or minus 1 degree BTDC). You must loosen the distributor hold-down clamp in order to gradually rotate the distributor to achieve the correct timing. Tighten the distributor hold-down clamp and verify timing is correct.
Turn off the engine and remove the timing light. Reconnect the hose to the distributor vacuum mechanism. Reconnect the wire connector to the vacuum switch assmebly. Leave the tachometer connected for the next section.
Setting Fast Idle Speed
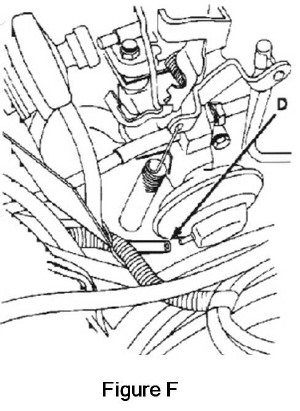
1. Disconnect and plug the EGR vacuum hose (D) (Figure F).
2. Place automatic transmission in the PARK position and manual transmission in the NEUTRAL postion.
3. Start the engine.
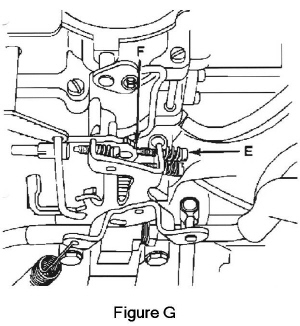
4. Position the fast idle speed adjustment screw (E) (Figure G) in contact with and against the shoulder of the SECOND step (F) of the fast idle cam.
5. Refer to the Vehicle Emission Control Information label located under the hood. Adjust the fast idle speed to the correct RPM (Typically 750 RPM plus or minus 50 RPM) Adjust by turning the fast idle speed adjustment screw (E) (Figure G).
6. Remove the fast idle speed ajustment screw from the fast idle cam and allow the engine to return to curb idle speed.
7. Turn ignition to OFF.
8. Reconnect the vacuum hose to the EGR valve.
Curb Idle Speed and Sole-Vac Throttle Positioner
NOTE: During this operation you should consider having a second person assist you.
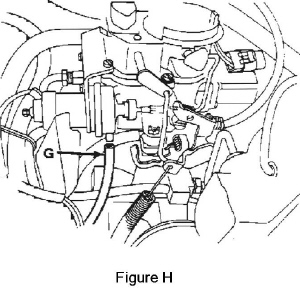
1. If your Sole-Vac accuator is equipped with a vacuum hose remove it and plug (G) (Figure H)
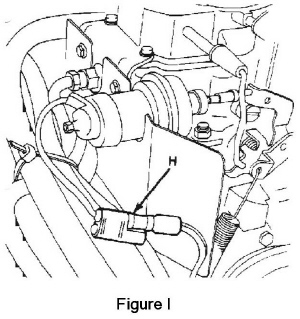
2. Disconnect the Sole-Vac holding solenoid wire (H) (Figure I).
3. Start the Engine.
4. Have your helper set the parking brake and also depress the service brake. Manual Transmission cars are to be placed in NEUTRAL and Automatic Transmission Cars placed in DRIVE. If you do not have a helper make sure to firmly block the wheels and set the parking brake.
5. Have your helper (or you) increase the engine speed to above 1200 rpm for 3 - 5 seconds and then allow the engine to return to curb idle speed.
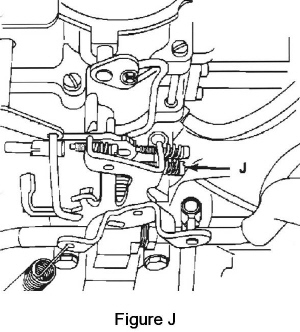
6. Adjust the carburetor curb (slow) idle speed adjustment screw (J) (Figure J) to obtain the desired curb idle speed rpm. Refer to the Vehicle Emission Control Information label (Typically 500 rpm, plus or minus 50 rpm).
Steps 7 - 10 apply to cars with a vacuum accuator on the Sole-Vac.
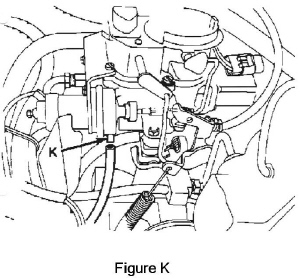
7. Apply direct source of 34-51 kPa (10-15 in Hg) vacuum to the vacuum actuator (K) (Figure K). Use a Hand Operated Vacuum Pump to accomplish this.
8. Increase the engine speed to above 12000 rpm for 3 -5 seconds and then allow the engine to return to curb idle speed.
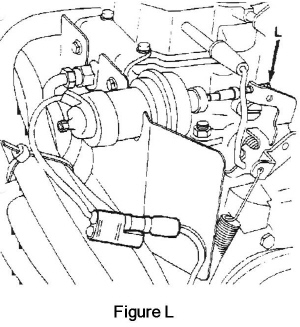
9. With the Sole-Vac throttle positioner fully extended, ther the vacuum actuator adjustment screw (L) (Figure L) on the throttle lever until the specified engine rpm is obtained. Refer to the Vehicle Emission Control Information label (Typically 650 rpm, plus or minus 50 rpm).
10. Disconnect the vacuum source from the vacuum acuator motor.
11. All cars With a jumper wire, apply battery voltage (12V) OR reconnect the holding solenoid wire connector back to the Sol-Vac THEN disconnect the air conditioner compressor clutch wire and then turn the A/C on (too cold and fan on). Either method will energize the holding solenoid.
12. Hold the throttle open manually to allow the Sole-Vac throttle positioner to fully extend. NOTE: On cars without the vacuum line the positioner should extend on its own. You must do this on cars with the vacuum line.
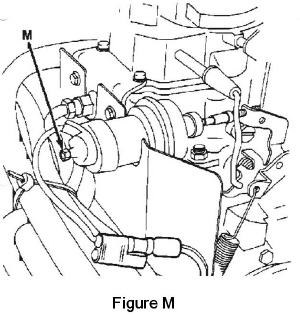
13. Adjust the Sole-Vac throttle positioner (M) (Figure M) to obtain the specified engine rpm. Refer to the Vehicle Emission Control Information label (Typically 650 rpm, plus or minus 50 rpm).
14. Turn the engine OFF.
15. Remove jumper wire form the Sole-Vac holding wire connector (if connected).
16. Reconnect the Sole-Vac holding wire connector.
17. Remove the plug and reconnect the vacuum hose to the vacuum acuator (if equipped).
18. Disconnect the tachometer.
19. If disconnected, connect the A/C compressor clutch wire connector.
20. Reinstall air filter assembly. Make sure all vacuum connections are correct.
21. Road test vehicle.
